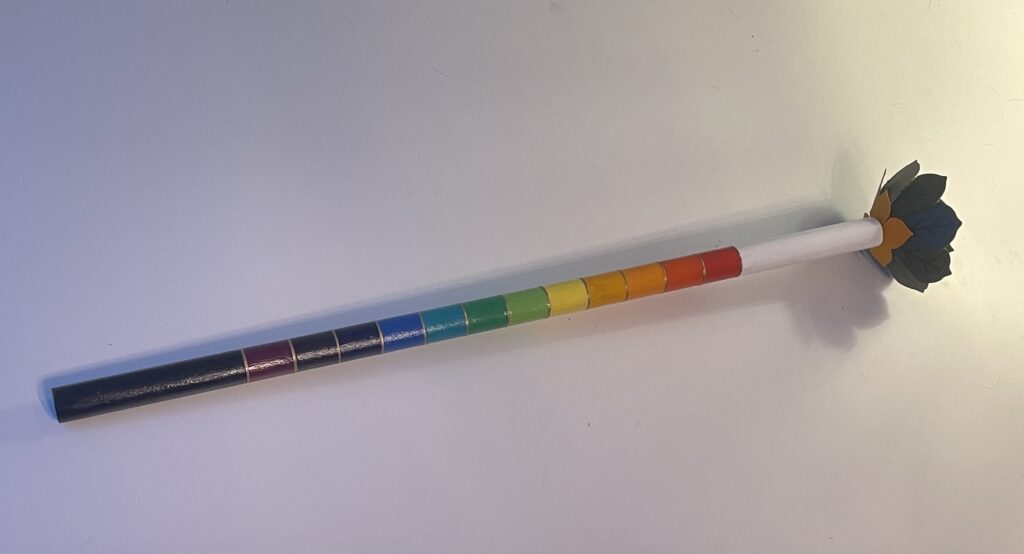
I originally constructed my Lotus Wand back in 2016 as a part of my Neophyte Adeptus Minor work. Coming into it without much experience either creating or using such a tool, however, there were mistakes I made along the way–as one inevitably does. The standard reference for instructions on how to create the Lotus Wand is still the Ciceros’ Creating Magical Tools, provided of course that you’re fortunate enough to find a copy. That book lays out basic instructions for crafting the wand, but it becomes apparent that the text was written by a carpenter and an artist when one notices the near absence of instruction when it comes to basic techniques that are nonetheless essential for the construction of a quality piece of work.
As a novice to either woodworking or painting, one is going to be seriously hindered by that lack of instruction–as I myself was. When I first created a Lotus Wand I managed to nail the construction the first time, but in crafting a new one for myself I had to take three attempts, learning a bit more about technique each time. This post attempts to fill in some of the blanks that the Ciceros left, and to walk you through the fundamental information you need to know in order to create a professional looking and aesthetically pleasing Lotus Wand while hopefully avoiding the pitfalls of such a project.
Size Matters
The single biggest mistake I made the first time I crafted the Lotus Wand was making the wand way too long. The Adept is intended to hold the wand by the colored band which corresponds to the Zodiacal sign being worked with, and I wanted to make each band large enough to hold without having to touch the adjacent bands at the same time. In order to get this length on each colored band, I ended up making the shaft of the wand a full 36 inches. This was a bad idea. As one who had never used a Lotus Wand before, I did not realize or consider how this length would feel in practice, or how much clearance would be necessary in order to wield it at all. It’s difficult to overstate how awkward that length ended up being. Pro tip: if your Magic Sword is easier to wield in ritual than your Lotus Wand, you’ve probably gone astray.
This time around, I stuck to the rule of thumb that the ideal length is around the distance from your elbow to the tip of your middle finger. In my case this ended up being approximately 20 inches, which I believe is a perfect length: this allows for making the colored bands one inch wide each, with four inches left over each for the black and the white bands. The colored bands can be gripped by thumb and forefinger, while the black and white bands can be held a bit more comfortably. The Ciceros recommend a length of 26 inches, which is about as long as I would go with the shaft of the Lotus Wand. If you aim for longer than that, you’re likely to find the tradeoff an unproductive one.
A Word About Materials
The materials list follows, but first a few words about the items on the list.
All of the paints that you will need are listed below, and can be found in my post Painting the Golden Dawn Colors. Liquitex has all of the colors available except as noted.
I used only flat head paintbrushes for this project, from a set ranging in brush size from 1 to 12. I found that the smallest and largest brushes in this range were the most useful to me, but you’ll likely be washing and swapping out brushes frequently enough that you’ll probably want at least two small brushes and 2-4 larger ones to allow your paintbrushes sufficient drying time.
I recommend using a standard dowel from any hardware store for your wood blank. During one of my attempts I chose to use an oak hardwood dowel, but I found that the slight texture of the wood grain increased the paint bleed I got between the colored sections of the wand. Feel free to use oak or another wood if you wish, but consider applying an additional coat of gesso (remember to sand it down afterwards!) and be aware that the tape sealing technique discussed below will be especially important in such a case to offset the additional risk of bleeding paint.
Sheet copper is the recommended material for the lotus petals due to the magical correspondences of the wand. The Lotus Wand is sacred to Isis, and by extension to Venus. The lotus petals are accordingly made of copper as the metal of Venus. I was able to find a suitable sheet of copper at my local Home Depot.
Be sure to choose a gloss varnish that is intended for use in painting! As a total noob to painting and woodworking the first time around, I chose a clear gloss wood varnish. Predictably, the varnish yellowed over time, leaving the white band and the white petals of the lotus looking dingy and aged. Combined with the unwieldy length of my original, this provided the impetus for crafting a new Lotus Wand in the first place.
Materials & Equipment Needed
- Wood dowel, 3/4″ diameter and 20 inches in length
- Gesso (I used Liquitex Basics Acrylic)
- Paints (all Liquitex Heavy Body Acrylic unless otherwise specified)
- Titanium White
- Naphthol Red Light
- Pyrrole Orange
- Cadmium Orange Hue
- Yellow Orange Azo
- Cadmium Yellow Light
- Vivid Lime Green
- Light Green Permanent
- Golden Artist Colors Light Turquois (Phthalo)
- Cerulean Blue Hue
- Phthalocyanine Blue (Green Shade)
- Prism Violet
- Deep Magenta
- Mars Black
- Folk Art 449 Olive Green
- Liquid Leaf 6110 Classic Gold
- Liquitex Professional Matte Gel Medium or other matte gel medium
- Liquitex Professional Gloss Varnish or other gloss varnish
- Flat head brushes
- Paintbrush soap (e.g. The Masters Brush Cleaner and Preserver)
- Masking tape or painter’s tape
- Sheet copper (an 8″ x 10″ sheet will suffice)
- Emery cloth
- Fine sandpaper (240-400 grit)
- Sharpie or other permanent marker (optional)
- Hanger bolt
- Brass locknut to fit on hanger bolt
- Drill and drill bit (to match diameter of hanger bolt)
- Hex driver (to match size of locknut)
- Jigsaw with metal-cutting blade (or tin snips if you enjoy a challenge)
Construction Overview
Now if you’ve gotten this far and you’re thinking to yourself “my god, this list of materials is humongous!” then I’ve got news for you: you’re right. There are a lot of materials for this project, and every single one of them is absolutely necessary. Creating a Lotus Wand is a laborious process, and an expensive one if you’re purchasing all of these materials for the first time. But if you’re crafting a Lotus Wand, then my assumption is that you are an Adept in the Golden Dawn tradition, which means you’ve likely already put a great deal of time and monetary investment into your work and studies. And fortunately, the paints–altogether the most expensive component of this project–will serve you well in creating all of your other Adept tools as well as any other wands or tools you might choose to craft going forward.
There are two separate portions to the construction of the wand, these being the shaft and the lotus flower. These can be tackled in any order.
Creating the shaft involves cutting the dowel to size, giving it a base coat of gesso, and sequentially painting the color bands from white through the rainbow to black, assiduously masking the bands along the way to guard against your biggest enemy during this part of the project: paint bleed. Once the shaft is painted you’ll mask narrow bands at the transition points between the colored sections and use liquid leaf to create an elegant gold band separating each section. Finally you’ll cover the shaft of the wand in gloss varnish to seal it.
Constructing the lotus flower entails making paper stencils of your lotus petals, roughing down the sheet copper with emery cloth, affixing the stencils to the sheet copper, then cutting out the lotus shapes. The rough edges from the metal cuts are sanded smooth, then the petals are painted. Finally the wheels of petals are placed onto the hanger bolt and capped with the locknut, and the individual petals are bent up into position so they resemble the nested petals of the lotus flower. A hole is then drilled into the end of the shaft to accommodate the hanger bolt, which is screwed in to affix the lotus to the shaft and complete the wand.
Painting the Wand
First, cut your dowel rod to size. A power saw is ideal for this, but a hand saw is perfectly serviceable. As mentioned above I chose a length of 20″ for my wand, which is approximately the distance from my elbow to my fingertips. Any shorter a length is likely to be relatively unusable, whereas going much longer will make the colored bands somewhat easier to hold but the wand will become more unwieldy the longer you make it. If you choose a length of 20″ you end up with 4″ each for the black and white bands, with twelve colored bands each of 1″ in width. If you go for a total length of 26″ you can enlarge the colored bands to 1.5″ each while maintaining the same 4″ length on the black and white bands. Ultimately the decision comes down to your own practical and aesthetic considerations.
Once you have cut the dowel to the appropriate length, sand off any rough edges from the cut and then cover the dowel with a coat of gesso. Let the gesso dry and give it a light sanding, then wipe the dust off with a dry cloth. If using an oak dowel or another type of dowel that shows any wood grain, I would add an additional coat of gesso, sanding after both the first and the second coat.
Take a pencil and make markings at the points where your bands will be located. For a 20″ dowel you’ll make a mark at the 4″ point, then again each inch thereafter until you reach the 16″ mark, leaving a 4″ width on either side for the black and white bands. As previously mentioned, if using a 26″ dowel your marks will be at 1.5″ intervals instead.

Next, use the masking tape or painter’s tape to mask off one of the 4″ end sections. This will be your white end. You’ll wrap the tape around what will be the red band, then paint the end section with Titanium White. Allow about 30 minutes drying time, then put on another coat of white. Once this dries, remove the tape and you should have a fairly neat band of white with crisp edges where the paint met the tape.

Now that the first band is done, it’s time to learn the most essential technique you will use during this portion of the wand’s construction: sealing the masking tape. First, you’re going to wrap a band of masking tape around the very end of the white band, lining up the edge of the tape with the edge of the paint and leaving a blank space next to it where we will be painting our first colored band. Put another band of tape on the other side of the unpainted band, lining it up with the mark you previously made in pencil. You should now have a 1″ unpainted band with masking tape on either side of it.
With the band masked off, take a small flat brush and pick up a bit of the color you just used on the previous band (in this case Titanium White). Brush a small amount of the color up against and onto the tape that covers your already-painted band. This ensures that if any paint bleeds under the tape (and it will!), it’s paint of the color that we actually want on that side of the tape. Having red paint bleed onto your white is a real pain, but if we bleed white under the tape instead then once it’s dry we can paint over that, and the tape will remain sufficiently sealed that the new colors will not bleed. Make sure to really push the paint up against the tape in order to seal it properly. The pictures below show the transition from the red band to the red-orange band, but the principle remains the same regardless of which color you’re using.
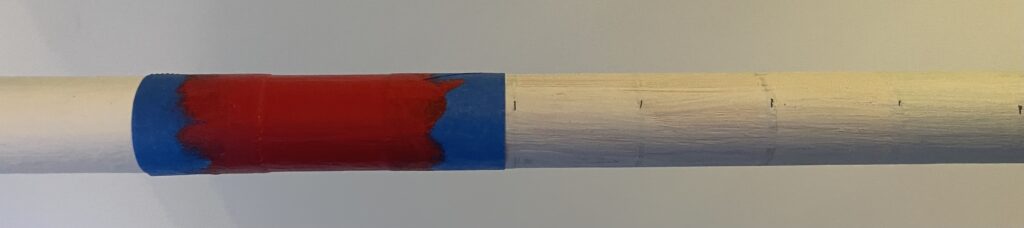
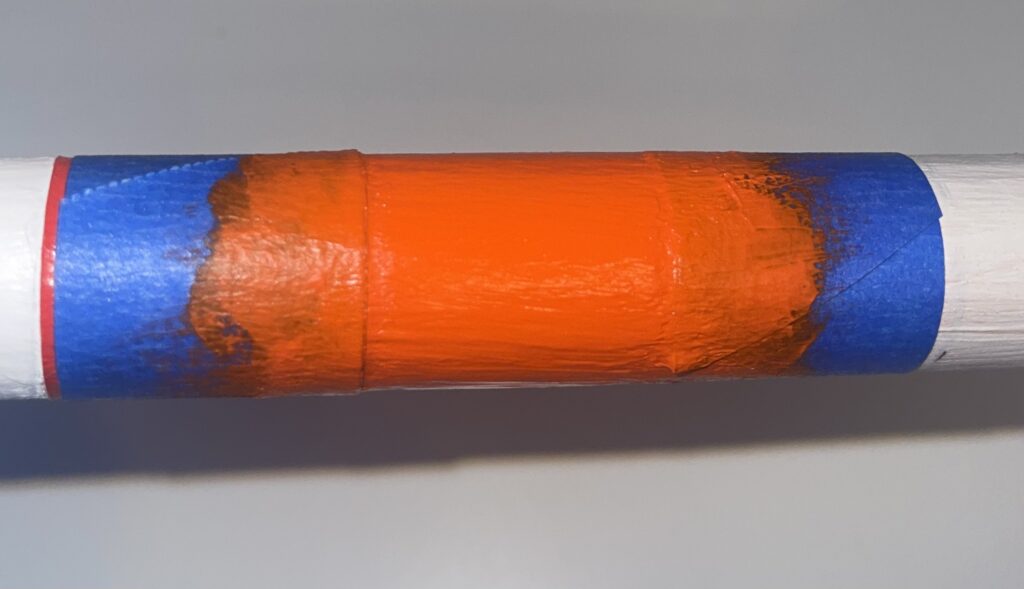
You will need to use two coats of paint on each band in order to get sufficient depth of color and to adequately cover the color that was used to seal the tape on each given band before overpainting. Allow approximately 30 minutes of drying time between each coat, and between painting a coat and removing the masking tape.
You will develop a particular rhythm for this portion of the wand creation. You’ll unwrap the masking tape from the previous band, then mask off the next band. Seal the tape using a small flat brush and the previous color, let dry for 30 minutes. Paint on a coat of the current color and let dry. Paint another coat and let it dry. Unmask the current band and mask off the next one. Repeat until done, and don’t forget to clean your brushes after each use.
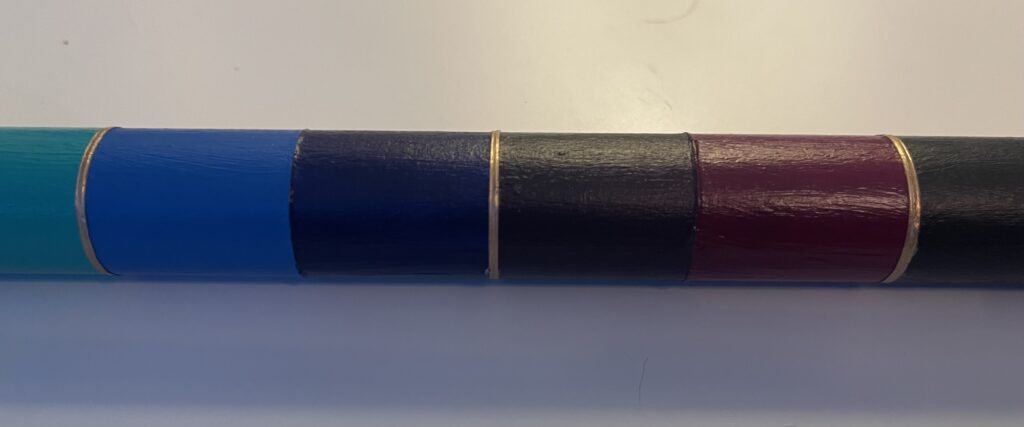
When painting the bands, paint the colors in spectrum order as follows:
| White | Titanium White | Invoking | ||
| Red | Naphthol Red Light | Aries | ||
| Red Orange | Pyrrole Orange | Taurus | ||
| Orange | Cadmium Orange Hue | Gemini | ||
| Orange Yellow | Yellow Orange Azo | Cancer | ||
| Yellow | Cadmium Yellow Light | Leo | ||
| Yellow Green | Vivid Lime Green | Virgo | ||
| Green | Light Green Permanent | Libra | ||
| Blue Green | Light Turquois (Phthalo) | Scorpio | ||
| Blue | Cerulean Blue Hue | Sagittarius | ||
| Blue Violet | Phthalocyanine Blue | Capricorn | ||
| Violet | Prism Violet | Aquarius | ||
| Red Violet | Deep Magenta | Pisces | ||
| Black | Mars Black | Banishing |
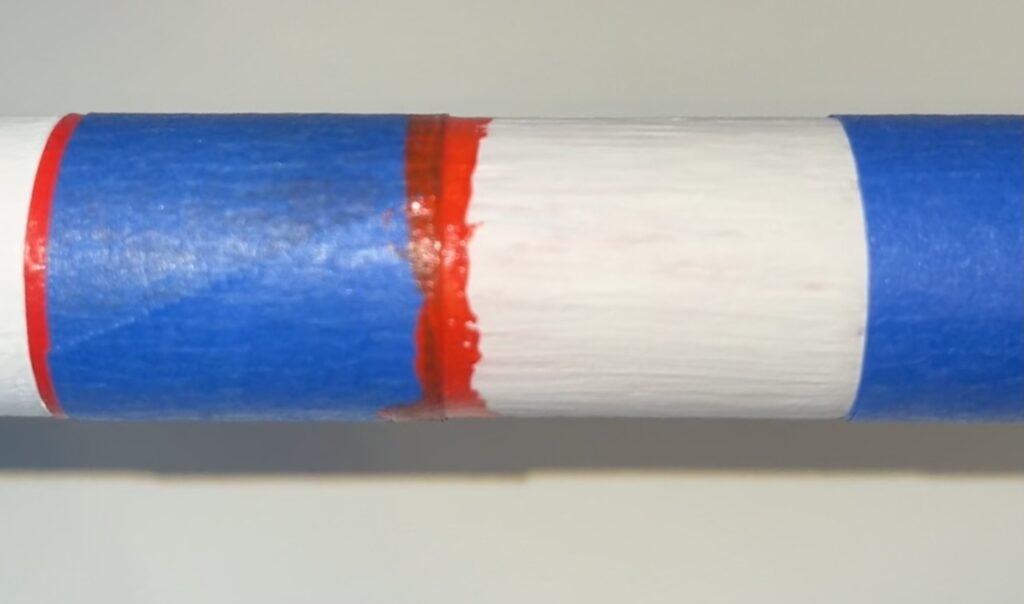
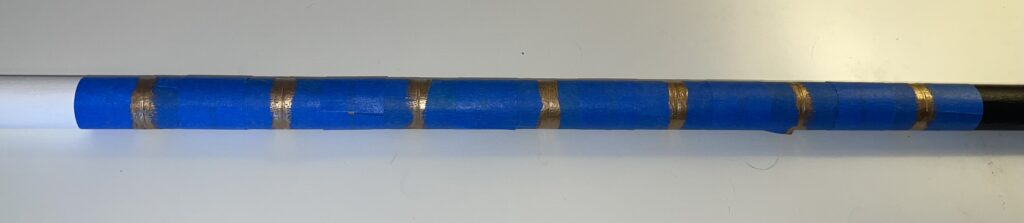
Once you finish painting the black band and have a lovely rainbow colored wand, you can add narrow gold bands between the colored sections to highlight them and accentuate the wand with an elegant touch. To do this, first mask off all but a very narrow band centered over the line where one color transitions to the next. The bands should be small, approximately one or two millimeters in thickness. You can mask off multiple bands at once, but my experience with a 20″ wand was that it was easiest to mask off every other band, paint on the gold, and then do the other half of the bands in a second batch.

Now here’s where you need to be careful, lest you run into the same problem I did. The technique of sealing the masking tape with the previous color works great when you’re working your way down the wand–but what happens when you need to seal the tape at the junction of two colors? We can’t use either color of paint, because bleed of either color into the other would be bad. And as much difficulty as bleeding paint may cause, the Liquid Leaf we’re using for the gold bands is less viscous than paint and will assuredly bleed even worse if we don’t guard against it.

This is where the gel acrylic medium comes in. Gel medium effectively gives the body of paint without any pigment, which means that it dries entirely transparent. Paint two generous coats of gel medium over the area masked off for the gold bands, letting dry in between coats. Then use a small flat brush to apply the Liquid Leaf. The paint will have a bit of a dull appearance when it first goes on, but will dry to an attractive gold color. Let the Liquid Leaf dry for 30 minutes before removing the masking tape. Repeat the process for any additional bands.
Congratulations! You’ve finished painting the rainbow shaft, which in my experience was the hardest part of crafting the Lotus Wand. Now it’s time to turn our attention to the lotus flower itself.
Crafting the Lotus Flower
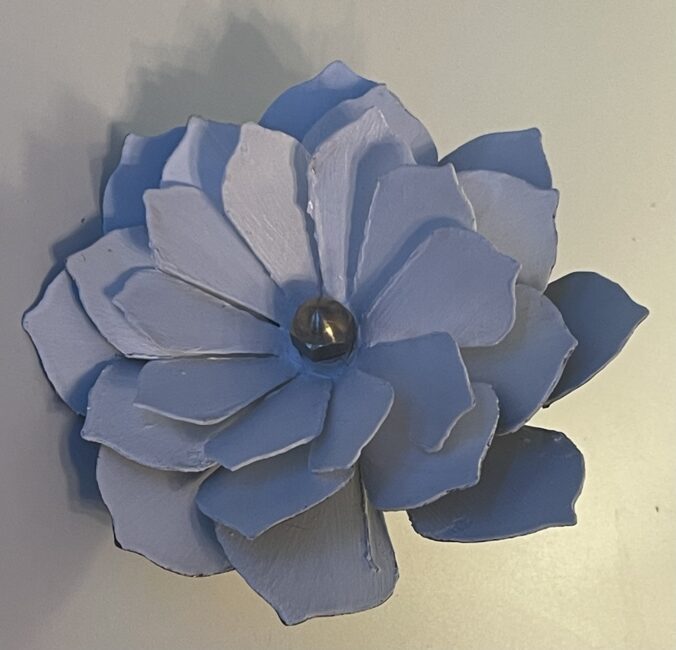
Because I reused the flower from my previous Lotus Wand, merely touching up the paint and the varnish, I don’t have any construction pictures to show (at least not yet–if I end up recrafting the lotus, I’ll be sure to update the post). This part of the construction is less fussy than the shaft, however, so hopefully your efforts won’t be hindered by the lack of visual references.
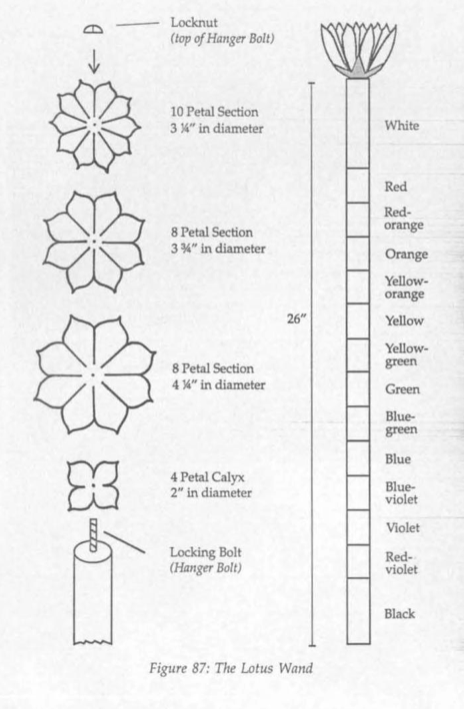
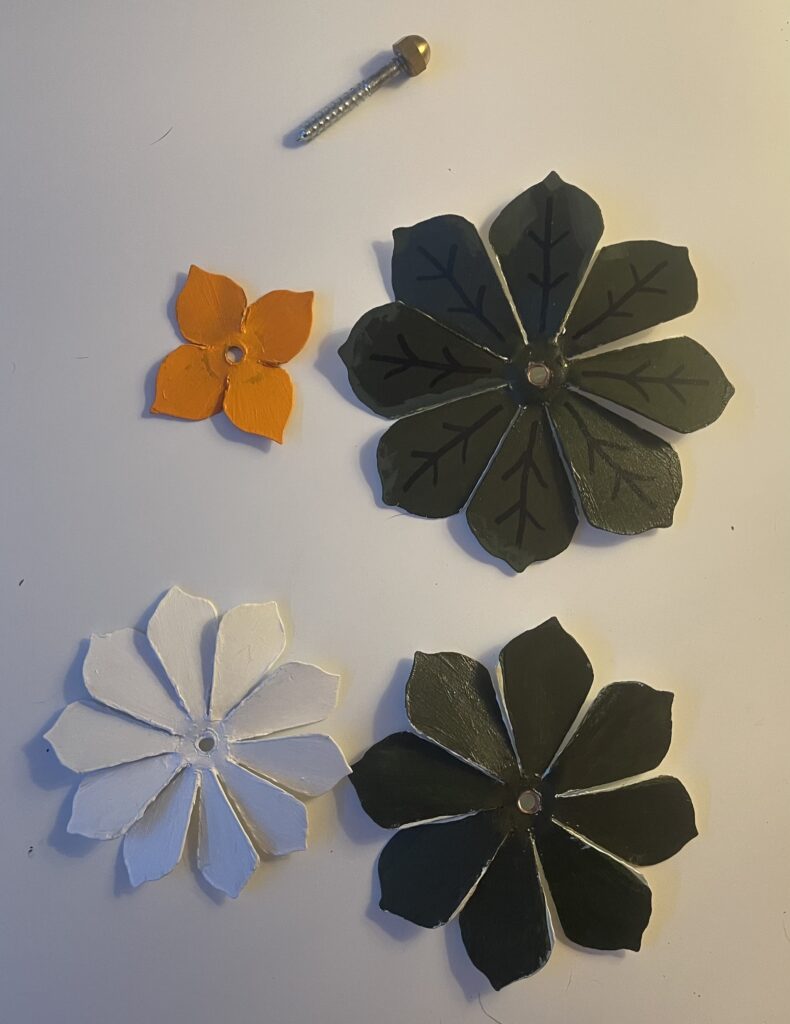
Begin by taking a piece of paper and creating stencils for the three petal sections and the calyx. The diagram of the Lotus Wand from the Ciceros’ Creating Magical Tools is reproduced below, and illustrates the proper form and size of the petals. You’ll end up creating a 10-petal circle of 3.25″ diameter, two 8-petal circles of 3.75″ and 4.25″ respectively, and finally a 4-petal calyx with a 2″ diameter, as shown. This diagram also serves as a helpful visual reference for the color ordering on the painting of the shaft if one is needed.
You may choose to freehand the lotus petals or to use a compass and protractor, but the easiest method may be to scale the diagram above to 1:1 size, print it out, and trace the stencils from the diagram images. Either way, once you have the stencils created, cut them out and set them aside.
Next, take the sheet copper and block out where you’re going to put the stencils. Before proceeding, grab your emery cloth and rough up both sides of the copper sheet. Your goal here is to give the metal some texture in order to enable the acrylic paint to stick to the copper, in much the same way that a coat of gesso provides a bit of “tooth” to help paint adhere better. While it is possible to perform this step after the petals are cut out, you will have a much easier time getting an even rough on the surface if you do so at this juncture.
Once the sheet copper is appropriately roughed, tape the stencils to the sheet. Double-sided tape is recommended, as otherwise the stencil will begin to move around as the pieces of tape holding it in place are severed during the cutting process.
Using a jigsaw equipped with a metal-cutting blade, make rough cuts around your four petal stencils, leaving you with four separate square pieces each containing one of your stencils. Then take each piece and carefully cut along the lines of the stencil around the outside, and finally cut the long straight lines that lead toward the center of the three non-calyx pieces. Now take the drill bit which you have selected to match the diameter of your hanger bolt, and drill center holes through each of the pieces (use a bit of sacrificial wood as a backstop for the drill bit). Remove the stencil paper. At this point you should have four pieces of sheet copper shaped like the petal and calyx sections in the diagram above.
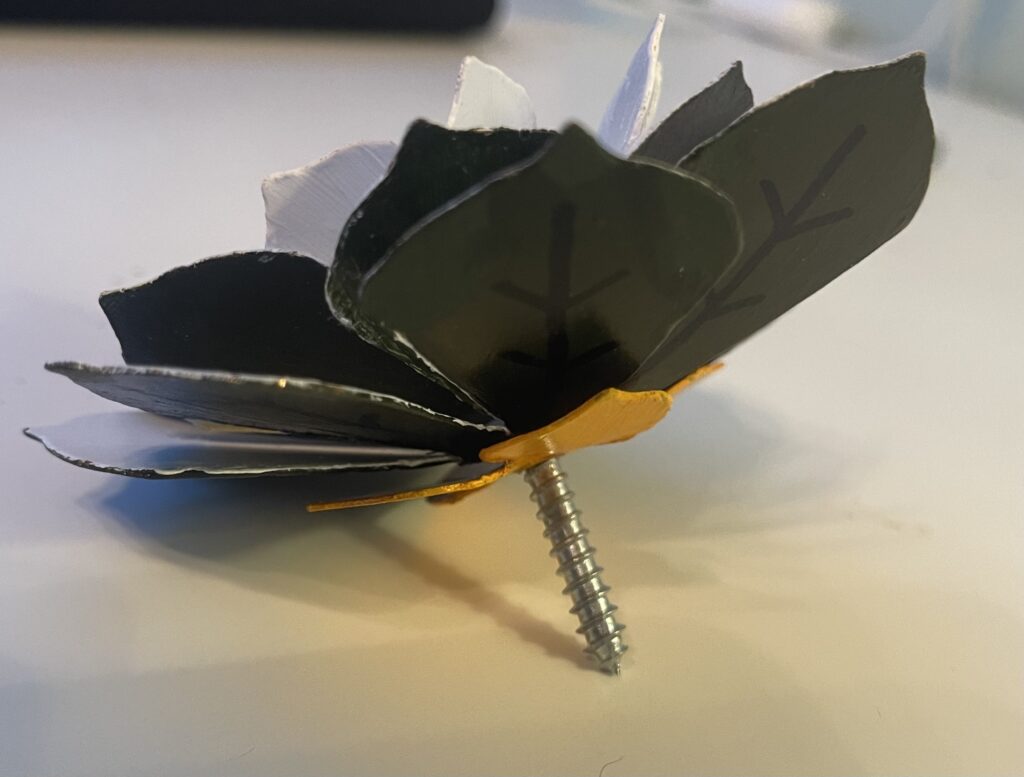
You will eventually need to fold the petals up around the locknut in order to achieve the shape of the lotus flower, and in order to do so the petals must be able to slide past each other. I found that it was best to take each petal and twist it slightly so it somewhat resembles the blades of a fan. Choose a direction, either clockwise or counterclockwise, and twist all of the petals on the 8- and 10-petalled sections about 20-30 degrees in that direction. This also has the benefit of exposing the cut sides of the petals, which you will now want to clean up. Sand down all of the cut edges until they are reasonably smooth (though painting will also make the edges smoother to the touch, so don’t worry too much about getting it perfect). It’s perfectly fine to use the same medium grit sandpaper for this purpose that you used for sanding down your wood and gesso.
Now it’s time to paint your petals. You may coat the copper with gesso first, though I chose to paint directly on the metal. Paint the calyx with Cadmium Orange Hue on both sides, and paint the small 10-petalled section with Titanium White. For the two 8-petalled sections, paint one side with Titanium White and the other side with Olive Green. Choose one of the two to be your outermost section, and paint leaf lines on the petals with Mars Black or simply use a Sharpie to create the lines. Once the paint dries on all the pieces, apply a coat of clear gloss varnish to finish.
Now that all of the separate sections are completed, assemble them together on the hanger bolt. I found it easiest to attach the locknut to the bolt, then screw on the pieces from innermost to outermost: the white 10-petalled section, the middle 8-petalled section, the outer 8-petalled section with the painted leaf lines, and finally the orange 4-petalled calyx. Make sure that the olive sides of the 8-petalled pieces are facing away from the locknut when attached to the bolt. You will probably need to begin bending the petals upward during this process, in order to allow all of the pieces to screw on fully.
Finishing Touches
At this point your rainbow shaft and your lotus flower are both complete, and all that remains is to affix them together. Using the same drill bit you used previously, carefully drill a hole into the top of the white end of the shaft. You will want to drill almost the full length of your hanger bolt (not just the length of the screw threading!), because you will need to screw the bolt in sufficiently far to keep the lotus flower from rattling around on top. As a rule of thumb, I’d say to drill in to approximately the length of your hanger bolt, minus half a centimeter.
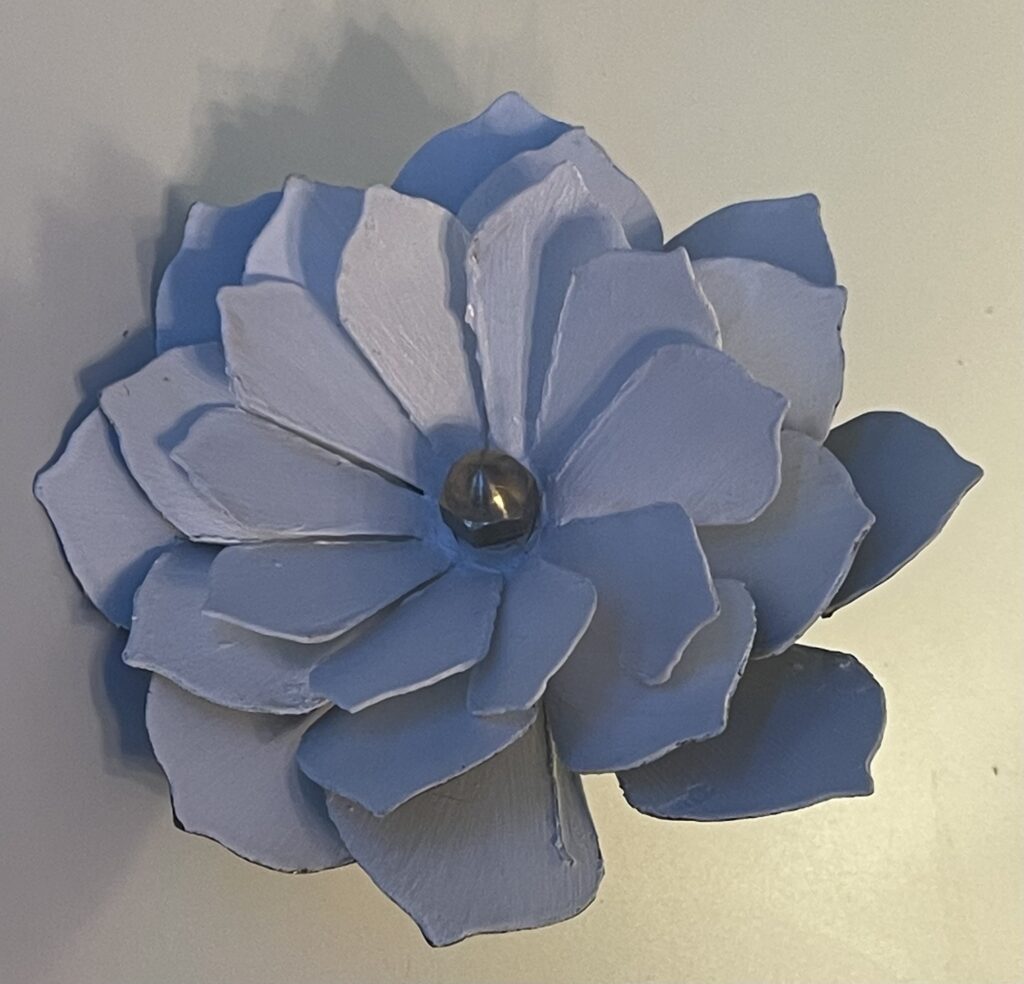
Using a hex driver that matches the size of your locknut, take your fully assembled lotus flower and screw it into the shaft. If you think you’ve tightened it sufficiently, give the wand a shake and see if the lotus rattles around. If it does, tighten further and continue until the lotus stays firmly in place when jostled. Fold the petals up around the locknut until they look suitably angled: there’s no rule of thumb here, you’ll just have to eyeball it.
It is traditional to place the Lotus Wand in a pouch or cloth made of white linen or silk. The consecration of the wand is beyond the scope of this post, but look out for a future blog post on the subject!
I hope this tutorial has given you the information that you need to create your own professional quality Lotus Wand. If you have any questions or feedback, or any tips to share, please don’t hesitate to let me know!